This entry in the HyperShock Build Logs will explain the process we use to fill our tires with foam. The full recipe can be found after the video below. The video doesn’t show the absolutely complete process because we can’t seem to actually get the whole process on video without something going wrong.

[S2 Robot]
In Seasons 1 and 2 we used CareFree tires. Flat out, CareFree tires are terrible for combat. Fight me. They don’t stay attached to the off-the-shelf hubs/rims in high torque situations and the slightest nick or tear can take the whole wheel off. The grip they offer is pitiful at best too. We needed something stickier.

[S6 Tires]
Our new tires are Vega W6 rain tires, they’re meant for go karts racing in the rain, where grip is everything. We started with the W5 tires in Season 3 and switched to the W6 tires when they came out in 2020. They’re just under 10” in diameter and were picked because they were the softest, stickiest, and lightest tire we could find. We started adding tire stickers in Season 5 because it improved the ebay resale value we had so much unused real estate on the sides of the robot.

[assortment of foam experiments]
We extensively tested different foams before Season 3. We started just playing with the foam, testing procedures to deal with the very short pot lifes. We were decided on tires and had found rims we liked, so we bought about a dozen to experiment with. We ordered several different foams from Smooth-On and filled the tires with each flavor. We even got fancy with colorant additives. After curing, we did some testing like bouncing them off the floor and hitting them with steel tubes. We cross-sectioned one of each with a bandsaw.

[cross section of a severely underfilled tire]
Our testing yielded two valuable results. Number One: Hard-cell foams are not even remotely viable. When they take hits, even dropped from a few feet up, the foam gets crushed, forming a flat spot. The crushed section collapses into something sand-like. When you’ve seen robots that appear to be leaking sand from their tires, it's often because they’re using some kind of hardware store insulation foam or other rigid foam (the wrong damn foam). Number Two: Foam can be really heavy. Initially, we tried the 10, 14, and 17 flexible foams (FlexFoam-iT! from SmoothOn), where the number represents density in pounds per cubic foot. We really liked the properties of the 10, but it was really heavy. The 14 gave us issues trying to fill tires with it, just didn’t want to flow through the funnel, and it was even heavier. I’m not sure if we even tried the 17 due to the weight. We were also playing around with color additives, but we were using too much at first and it interfered with the foam expansion. When we dialed it back to the recommended levels, we couldn’t get the color bright enough to be worth it. We think part of the problem was we were doing tests in mostly enclosed containers, so the expansion is somewhat hampered. Confident we were on the right track, we ordered samples for the flexible 7FR (flame resistant) and more of the 10. Did more experiments, this time without color additives, and were again really happy with the 10’s properties, but still couldn’t get it to quite fill a tire properly. The 7 was neat because it refused to catch fire, but wasn’t particularly durable when we were cutting and tearing it. This round of testing we also ordered a rigid foam, Foam-iT! 5. Rigid foam is totally the wrong thing. All of the properties were bad, although it filled a tire really easily, even with color. Finally, we ordered FlexFoam-iT! IV “tuff stuff”. It was much lighter than the X but had most of the same properties. Whatever they do to make it “tuff” really worked nicely. We’ve been using FlexFoam-iT! IV ever since.
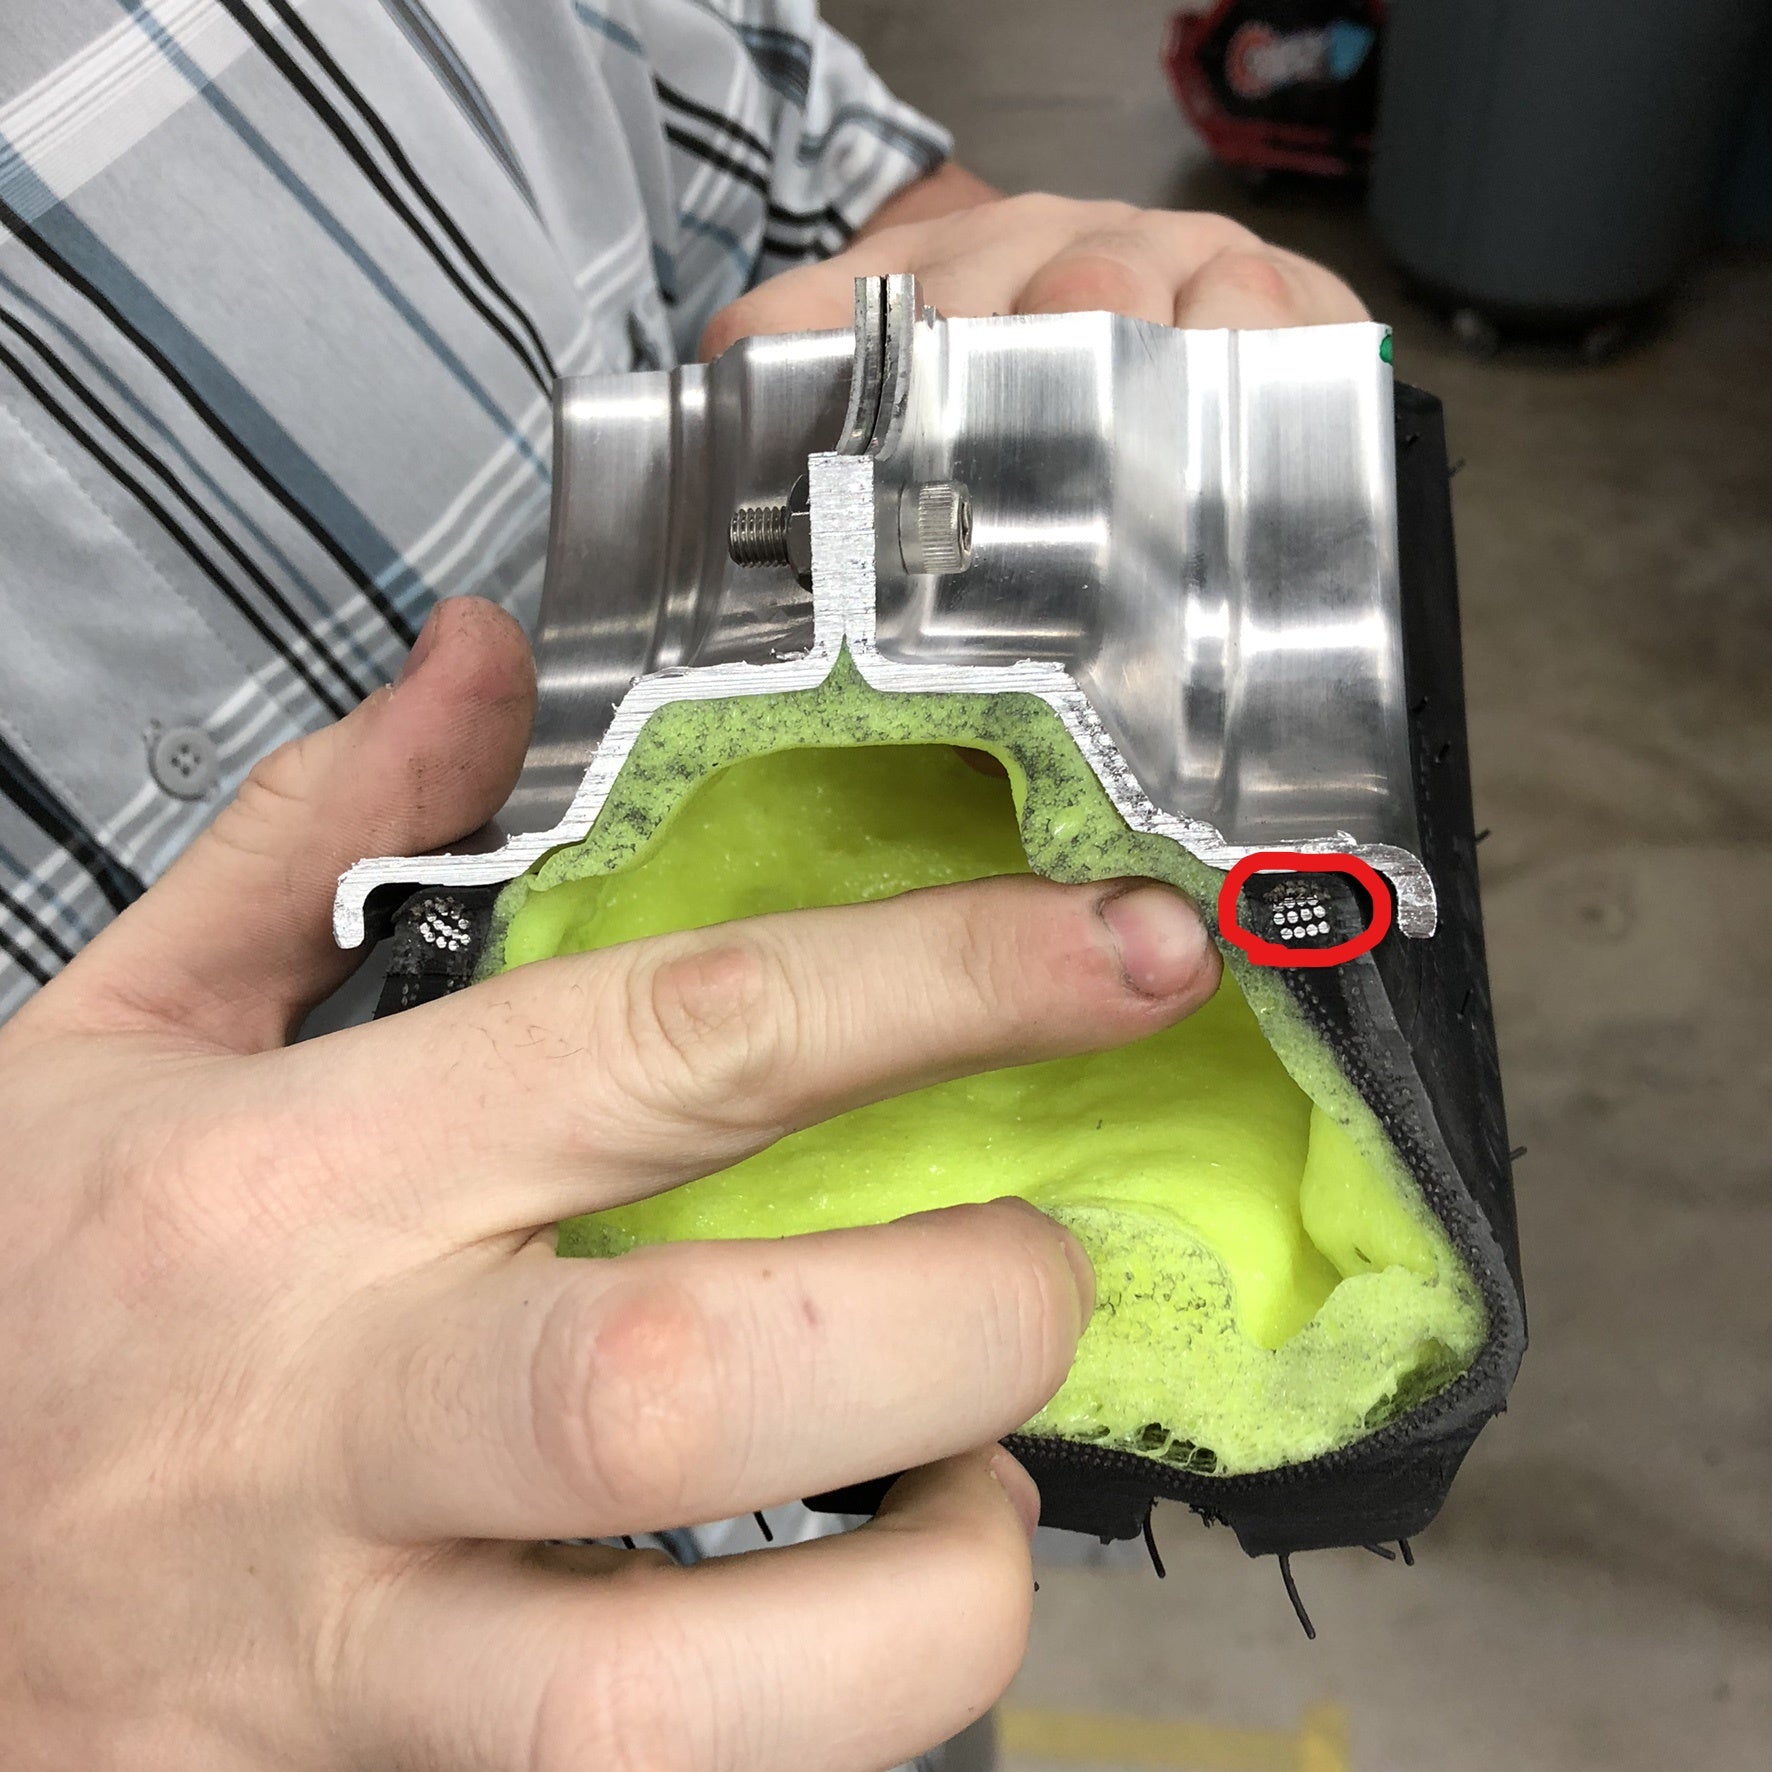
[Tire Bead Reference]
This picture is neat, but it's mostly here as a reference image showing what the “bead” is in a tire. It's a bundle of steel cables around the hole on either side of the tire that the wheel goes into. The purpose is twofold: retention and torque transfer. If the bead was just rubber like the rest of the tire, it would stretch and eventually slip. The bead ensures there’s a strong grip between the tire and rim or wheel.
We’re very happy with the lightweight wheel & tire solution we’ve developed and have successfully gotten the foam filling process down to a science. Want to make some? Here’s the magic recipe for finger-lickin’ good foamed tires! (Note: Do NOT lick fingers while foaming tires)
Kyle’s Famous Homemade Tire Foam-Due
Ingredients:
- Tires (ex: Vega W6 10x4.20-5)
- Single-Piece Rims (ex: Douglas 5 ⅛”x5", 1⅝” backspacing)
- Cleaning wipes
- Windex
- Power Drill
- Small drill bit (⅛”-¼” works)
- ½” drill bit
- Air compressor
- Silicone mats
- Plastic wrap
- Popsicle sticks, wide
- Expanding foam (ex: SmoothOn FlexFoam-iT! IV Tuff Stuff)
- Gloves
- A scale accurate to grams, I recommend a postal scale.
- Lots of large disposable cups, typically available from foam vendors. 1Qt paint mixing cups work great. You’ll need 2 cups per tire.
- A handheld kitchen mixer (That will be eternally ruined during this process)
- A large funnel, typically found in automotive sections, with a ½” or bigger nozzle (can cut the nozzle down to fit)
- Black automotive touch-up paint (it has the right semi-gloss to match the tires)
- Clothes you'd be ok ruining (foam does not come off fabric. Its not a stain, its a piece of foam)
- A buddy (critical)
Insert the rim into the tire
- Clean the wheel rims and the tire, especially the inside of the tire with a cleaning wipe.
- Put the rim into the tire. (See Appendix A for techniques)
- Drill a hole in the middle of the tire’s sidewall that is slightly smaller than the nozzle of your air hose.
- IMPORTANT: if you have asymmetric rims or otherwise care which side of the wheel is the outside (tread direction), drill the hole on the inside side-wall.
- Pinch the tire so you can spray the rim with windex to lubricate for the next step. You want the bead to be able to slide with the least amount of friction.
- Place the tire on its side. Push on the tread and manipulate the sidewall such that it lightly seals to the rim. You should see a light film from the windex where the edge meets the rim.
- Place the nozzle of your air hose over the hole drilled in Step 3 and inflate the tire until the bead pops into place all the way around on both sides. We’ve found we need at least 90psi.
- Mind your fingers, the tire will suddenly pop up and bead lock. You may need to add more windex. I recommend having a buddy hold the tire around the tread since they occasionally bounce when the bottom bead sets. This can sometimes take a while which can be a problem when working with a small compressor.
- Drill 2 more small holes, each about 120° apart on the same sidewall as the first hole.
- Expand all three pilot holes with the larger drill bit. Use a sharp knife to trim away the lining and any flaps around these 3 holes. These are the air holes so the foam can expand without forming voids due to trapped air.
- Widen one of the holes by cutting radially outward. Don’t cut into the tread or all the way to the bead. A somewhat flattened X is what we end up with. Be careful not to cut more than ¾”, or your fingers. This is the hole for your funnel, so make sure your funnel fits. You’ll need to fold these flaps up so they don’t fold under and interfere with the pouring process.
Repeat all of the steps up to this point with all of the tires you plan to fill before going further.
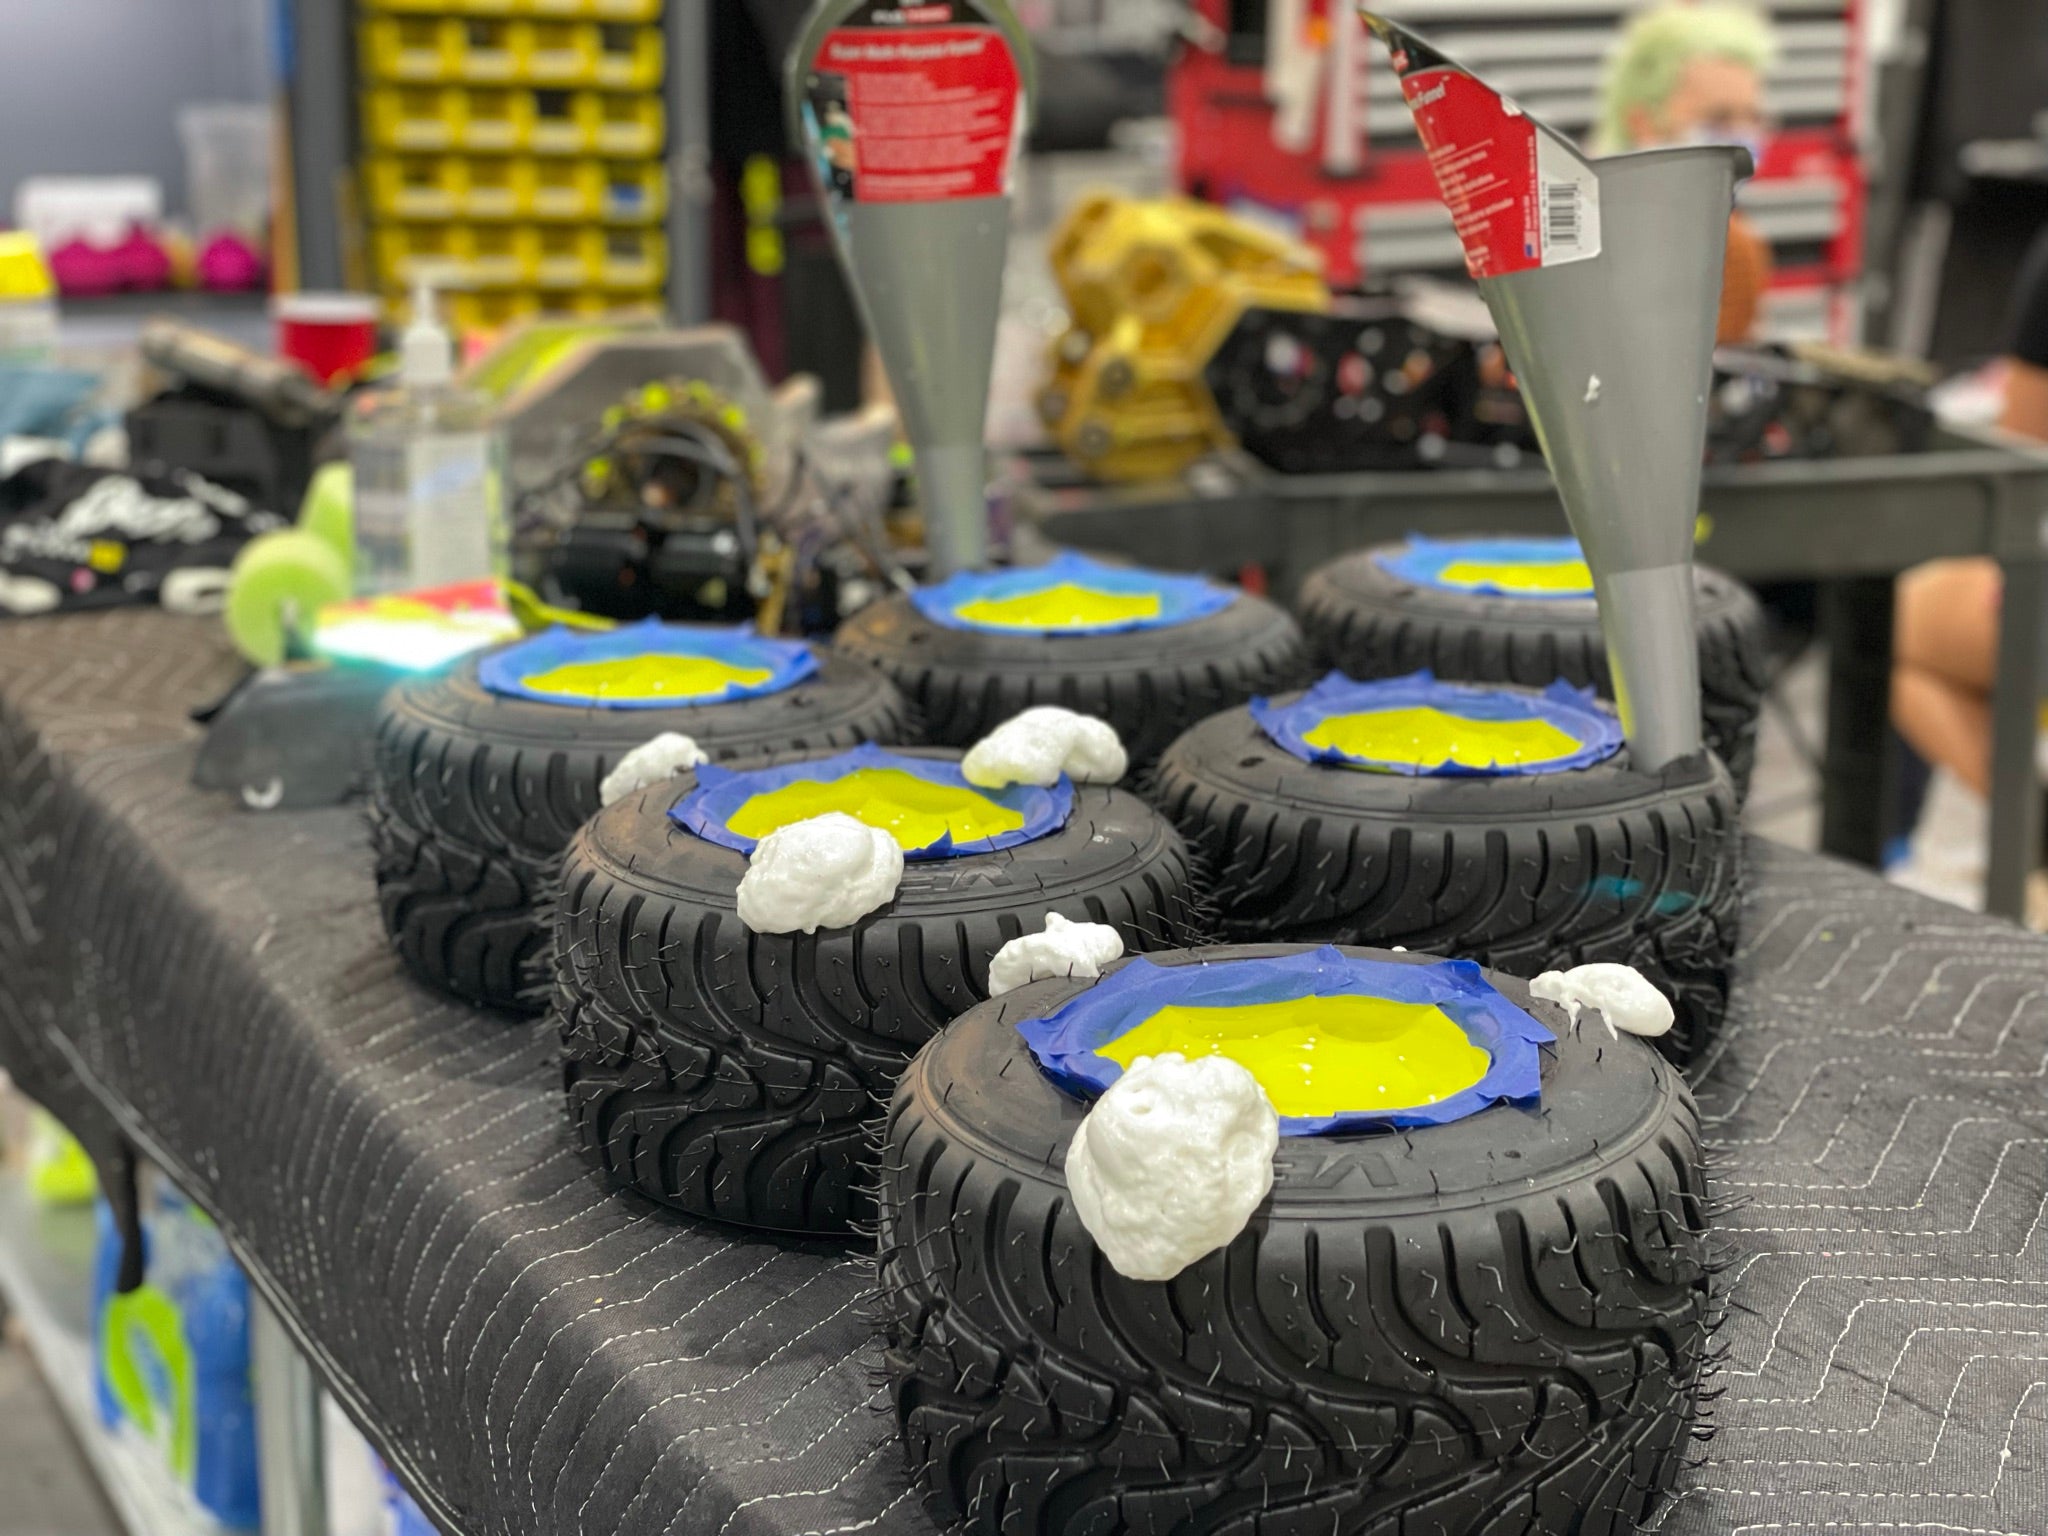
Fill the tires with foam
- Lay out and protect your workspace. We use two silicone mats as work stations and, if we’re on a wood table, put plastic wrap down to protect it since the foam doesn’t come off of wood easily. Working left to right across the foam filling workspace:
- Parts A and B jugs
- Scale
- Behind the scale are the cups.
- First mat, for mixing
- Kitchen mixer
- popsicle sticks
- Second mat, for pouring
- Tire
- Funnel
- Put on gloves. Remove/replace any clothing or other items you hold dear, you WILL get foam on it.
- Determine how much of Part A and Part B you need for your foam.
- Tip: How much foam do you need to fill your tires? You can either calculate the volume in CAD or experimentally determine the volume by filling a tire with water then measuring the water. If you use water, pour some acetone into the tire and swirl it around after draining the tire to eliminate the last of the water. Repeat that a few times, water will majorly interfere with the foaming process.

- Keep in mind the A:B ratio for your foam. The FlexFoam-iT! IV we use is 80A:100B by weight, so it’s important to get that right in order to get the correct expansion and curing of your foam.
- The FlexFoam-iT! IV we use has a 13x expansion rate. We have found we lose about 5% of the foam to being stuck in the cups, funnels, and stirrers. There is no good way to add more foam to a nearly full tire, so we just overshoot on the amount of foam
- Zero the scale with the cup for Part A. Fill the cup with the calculated amount of Part A and set it aside.
- Zero the scale with the cup you’re going to use for mixing and fill it with the calculated amount of Part B.
- IMPORTANT: Expanding foam has a very short pot life (only 30 seconds for FlexFoam-iT! IV), you need to start pouring into the funnel by 50% of the pot life time. This is why we recommend a powered mixer.
- Hold the cup with Part B in place and immerse the mixer. Turn it on, high power. Your buddy should pour the Part A liquid in quickly, then scrape the walls and bottom of the cup with the popsicle stick to get as much of it out as possible. Spend no more than about 10 seconds pouring. Pouring buddy should clear their hands of cups and dirty sticks. The buddy should put a fresh stick in one hand.
- Once the A and B are fully mixed (no more than 20 seconds since start), remove the mixer and set it aside. Don’t worry about the foam stuck to the stirrer or lost drips.
- Set the mixer aside, and buddy should take the mixed cup. hold the base of the funnel with one hand and stabilize the tire with the other. Buddy should dump the mixed cup into the funnel quickly, use the stick to scrape the walls and bottom of the cup, then use the same stick to push the liquid sticking to the sides of the funnel through. This should take no more than 10 seconds. About 30 seconds have elapsed at this point.
- Pouring buddy backs up so the person holding the funnel can extract it carefully from the tire. Don’t worry about drips or cleaning the funnel. This is why we overshoot by 5% on the measurements.
- Pick up the tire with two hands, hold it such that it's vertical, and look through the hole where the funnel was. You’ll see the liquid flow towards you. Just as it reaches the hole, rotate the tire slowly, stopping when you reach the next hole. Do the same: watch through the hole and make sure the liquid is flowing across the width of the tire. Rotate and check again at the third hole. Finally, rotate back to the first hole. By rotating the tire while the foam is still liquid, you’ve now created a skin on the inside of the tread which will help decrease the possibility of voids forming inside the tire. I like to give the tire one last swirl once it’s horizontal to try to help level out the foam in case the wave from rotating it has created a high spot.
- You should see about a golf ball’s worth of foam coming out of each of the three holes within a minute of setting the tire down. If you hear it bubbling and hissing, you may want to use a stick to clear the hole. The foam will peel off of the rubber easily once it’s cured.
- Cure time per the instructions is 2 hours, but we usually give them no less than 4 before we touch them. You can poke and pinch the foam that is pushed out of the air holes to check for doneness. It shouldn’t be even a little bit tacky, nor should it stretch much before tearing.
- Scrape or cut the extra foam off and use automotive touch up paint to blacken the exposed foam.
Appendix A
The next steps are about inserting a rim into the tire. Watch a couple videos of people doing this. It’s difficult, and takes a fair amount of upper body strength to do “easily.”
- Use windex or another alcohol-based cleaner to lubricate the outer side-wall and rim of a tire.
- Hold the tire with the soapy side up at about a 30° angle and mash the tire such that the hole becomes slightly oval shaped. The bead is a small bundle of steel cable, it’s not going to want to cooperate. Using a lot of force makes it easier, but I have almost torn off my thumb nail doing this a few times. Do this on a very lightly padded hard surface. We use a silicon mat on wood and metal tables.
- Hold the rim around the middle and push the lip of the rim against the oval-shaped hole in the tire. The lip of the rim should be nearly vertical. Thinking about this geometrically, you’re trying to force a circle through a slightly smaller circle: its gonna fight you. Keep the tire wall and bead lubricated with windex as you do this.
- Using one hand to mash and stabilize the tire, push straight down on the rim. It will pop through the bead. Beware of your thumbnail catching on the tire.
- Easy part done, flip the tire over. Lubricate the lip of the rim and the inside of the bead. You should be able to get about a third of the rim through the tire without much difficulty.
I mentioned earlier about watching some videos on this. I’m going to describe two different methods I’ve used successfully. Some people find it helpful to do this whole process on the floor so they can put their entire bodyweight into forcing the bead over. You can buy tools called “spoons'' which are made for putting wheels and tires together. They run the risk of damaging the powercoat on the rims, so I’ve declined using them. If you don’t care about possibly scratching the rims, spoons should make this part much easier.
First Method (works pretty well with soft tires)
- Pull as much of the rim out of the tire as you can without too much difficulty.
- There are now two points where the rim lip is touching the tire. You need to pin one in place and apply force starting from the other. I’ve found I can pin one by pressing the bottom of my rib cage against the tire, freeing up both hands.
- On the other side, use one hand to squeeze the tire tread in, folding the side walls in while using the palm of the other hand to mash the sidewall down. Position your palm such that the meaty part under your thumb is more or less over the lip of the rim. It’s mostly a matter of applying downward pressure, but you may find grabbing and pulling the tire down helpful.
- As you get more of the rim through, it gets harder. Be careful that you’re not pinning the other end of the tire too far down, you’re losing out on usable circumference. Right at the end, with about 90% of the rim through, you’re at the greatest risk of the exposed section rotating out, setting you back a bit. If you find yourself chasing that, you need to revise your rim pinning technique. This last little bit is where you need to use the most force to pull the bead over the last bit of the rim.
Second method (harder tires, like slicks)
- Get about half a dozen quick-grip clamps, ideally with big pads.
- Put the tire on a mat on the floor
- Clamp one spot super tight.
- Put another clamp just where the rim pokes through the tire. Make it tight.
- Do the same on the other side, but just a little closer to the first clamp.
- Use your foot or knee to mash the sidewall around the rim, adding a clamp every few inches.
- If the tires are really hard, you may need a second person to do the tire crushing part while you slide clamps on and around.
- You’ll have to keep re-tightening and adjusting your clamps so they don’t slip off. Yes this method is annoying, but it can be made to work.

Share:
Motors Modules | Motors, Encoders and Bear(ings)! OH MY!
Aesthetics | Powder, Paint, Acid, Vinyl