
In a previous blog, we talked about the forms we use in armor shapes. In this blog, we’ll share our experiences with adding colors to the robot. We’ve added a lot of the processes to our capabilities as our needs for specific colors and finishes have become more refined. We’ll talk about our use of powder coating, spray paint, and 2 kinds of anodizing.

I got Isaac on the phone to talk about the design ethos since he joined the team in Season 3. The headcanon he created was HyperShock is really 50 feet long and all scaled appropriately. Imagine 3 semi-trucks with full-size trailers for the amount of volume it fills, even a bit taller than that. His first thoughts on the design picked up on the Lambourghini-style louvers on the back, and he ran with that. It played well with the “very Miami” and “I can’t look away” elements he was already considering. He and Will wanted the robot to be so vibrant that no one can look away, that it becomes impossible to focus on anything else when it's on-screen. The color palette was one of the first things he helped shift. So many other teams had a black robot with some splashes or highlight colors. Very few robots that weren’t “art-bots” were using a base color other than black. They also insisted that we would wear non-black T-shirts since almost everyone had black shirts in Season 2.

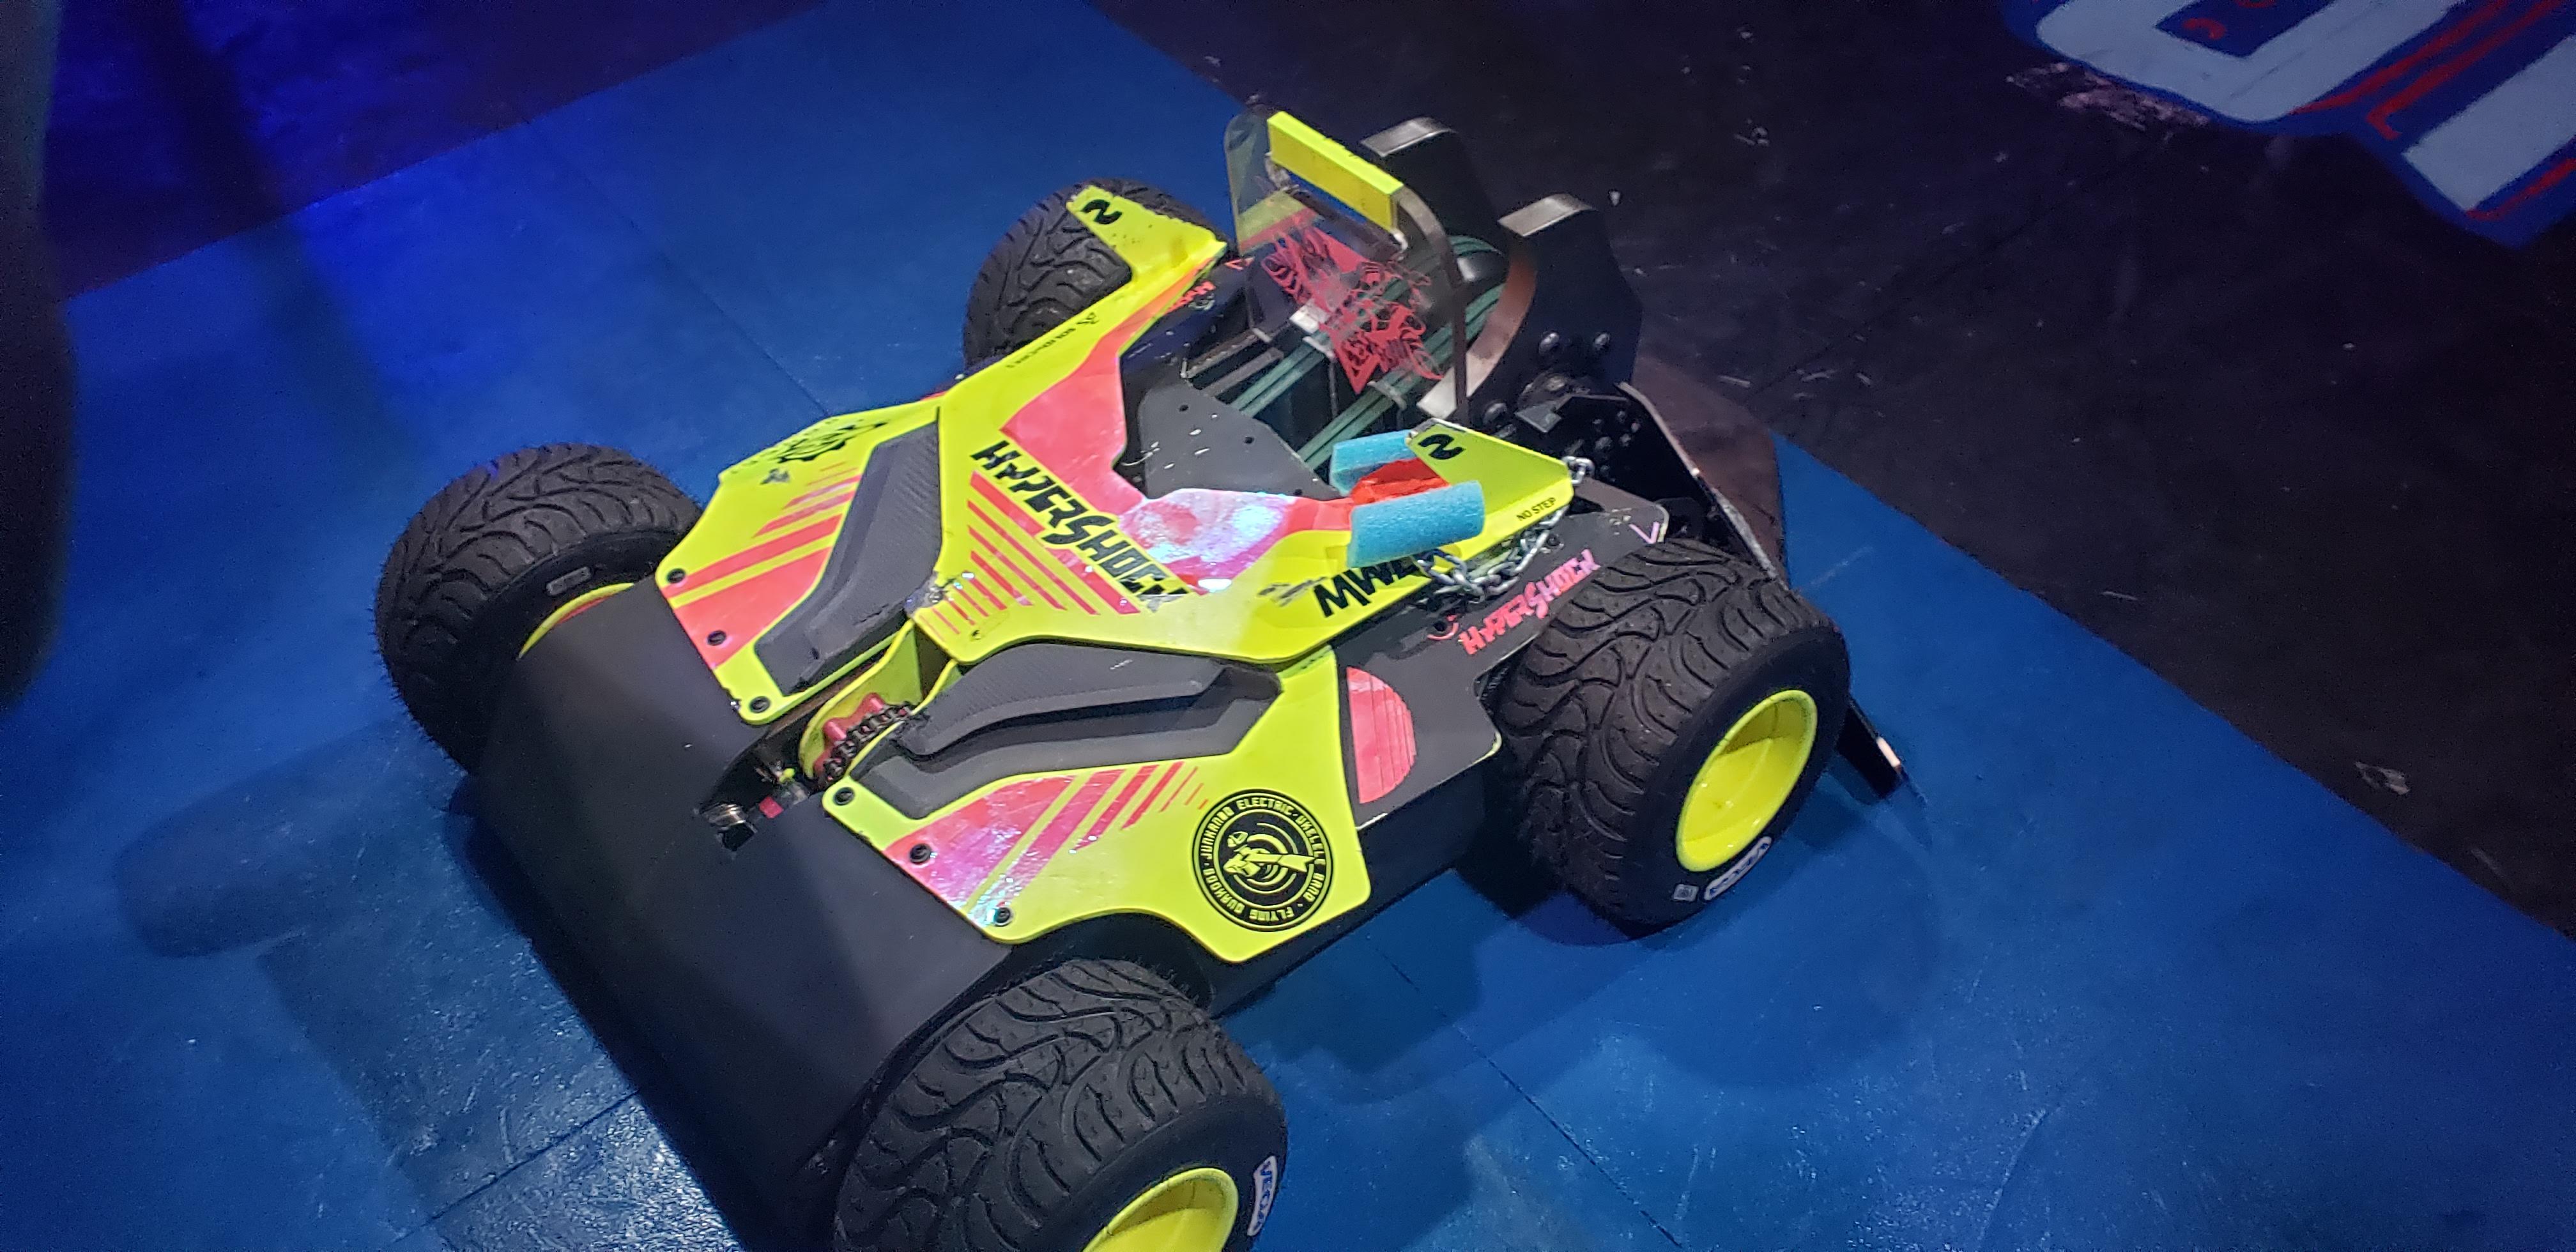
We spent a couple of weeks visiting local powder coaters, checking out sample pieces. We eventually bought small bags of half a dozen bright greens and yellows. Will was adamant that the base color should be yellow, but spotting the difference between neon and fluorescent hues on a computer screen can be dubious. Even on a certified, color-corrected screen, we couldn’t be sure of how fluorescent a color would turn out. Once we had the powders in hand, we cut them down to two pretty quickly and had sample parts done. Seeing them in the sunlight made it instantly obvious which one we’d be using. The other thing we love about powder coating is the finish is almost like injection-molded plastic, it helps with our pursuit of making the robot look like a toy.

When we showed up with an all yellow robot to Season 3, it got some looks, people loved it. The first time we took it outside we started getting complaints about seared retinas. The peak moment was when they made us reshoot our first tunnel walk-out with the tunnel lights turned down because we had gone off the end of the white balance scale.

The trouble with powder coating is it has to be done in a large oven and needs a pretty masterful touch to get the finish right. We’ve used a few different local shops to do it and have had wonderful results. We Powdercoat all of the external armor and the wheel rims. Our current powder coater of choice specializes in motorcycle parts.
The Season 3 robot did terribly, so in Season 4 we called it “HyperShock: Revengeance” and themed the robot a little more aggressively. We had a pretty ok run but we had broken our “no bare metal rule” with the unpainted wedge. We’d done some tricks with angle grinders to achieve some amount of texture, but we decided we would never do that again. Didn’t help that the vinyl wouldn’t stick to it.

Vinyl was a somewhat new strong element in Season 3. We started using a Cricut that year and Isaac found he could fill in all the small spaces with tiny decals. Most are so small they won’t ever appear on camera, but we know they’re there, and other builders occasionally notice. We like to post macro shots of the robot, so they show up in those sometimes. One thing the vinyl and tiny decals help cement into the brand is every part looks like a HyperShock part.

In Season 6, Isaac started using a Jazz motif with a lot of vinyl. We’d intended to put it on the back of the robot, but getting vinyl to stick to other vinyl with so many edges proved too difficult. We ended up using the same shapes on the sides of the forks and the upper side of the invertibility horns.

The other new design element in Season 3 was anodizing. There’s only so much that can be done with spray paint, and it compromises bearing surfaces and part fit. Anodizing is a great alternative and it retains the shiny finish. When we can, we’ve used anodized aluminum screws to add color in places that we would otherwise be stuck with black oxide. Another major benefit to anodizing parts is we can immediately spot areas where parts are rubbing or otherwise moving inside the robot. The finish is only so tough, meaning it doesn’t take much before it looks different enough to stand out. Finally, a factor in our build process is half the team won’t see the robot until it’s built for the first time in the pits. We can speed up our assembly process by referring to parts by color rather than by a description of what it does. We enjoy the inside of the robot being full of colors.

In Season 4 we started experimenting with titanium anodizing. It's much simpler than aluminum anodizing, enough so we could just do it ourselves. We didn’t start doing our own aluminum anodizing until Season 5. For Season 4, we anodized the titanium shafts for our weapon motor and the custom, screw-head protecting washers for the wheel axles. Titanium anodizing requires just a little bit of acid and a power supply capable of up to 100V. The colors correspond pretty consistently to a specific voltage, so repeatability is high. Etching the titanium so it can be anodized was a little more difficult. We enlisted Will’s dad to help us make an etchant solution using nitric acid. Later on, we found out that “Whink Rust Stain Remover” is basically just somewhat diluted strong acid and commonly used as a metal etchant. It works great, but the fumes are horrendous, so we do that part in our fume hood. It etched the glass in the hood, so that's all cloudy in one section now. Do not breathe those fumes, wear a respirator and either do it outside or with a filtered extraction system. We found a purple we really liked and still use that for our motor shafts. Connie and Alex took over titanium anodizing this year and added teal into our palette on the drive sprockets.

Seasons 3 and 4 we’d sent out for aluminum anodizing. We found a shop a few hours north that always has a bunch of color baths going (most only do red, blue, black) and they did great work. We wanted to anodize with a hot pink dye but couldn’t find anything better than the purple we’d been getting. So we decided to start doing a bunch of it ourselves. I was given the task of figuring it out. We’d found Caswell as a source for everything and happened to already have most of the kit we’d need to manage a bunch of hot buckets full of chemicals, just had to buy the chemicals and dyes. We tried a lot of colors and found that while there’s a formulaic approach that yielded good parts with a clean finish, the colors weren’t quite right. We did a lot of experiments changing up times and currents used in the anodizing and dye baths and had to settle for what we could make bright enough to be worth using. The anodizing process is involved. I’ve included an appendix with a detailed explanation of our anodizing process.

For Season 6 we did all of our pink and black aluminum and all of the titanium anodizing ourselves. We couldn’t do the weapon billettes with our setup, so we sent them to the same shop that Victor had used for gold anodizing on Rotator. We also had the drive and weapon motor mounts done in gold since we already had pink from the ESCs on the module.

In Seasons 5 and 6 we spray painted the chassis black. We’d always meant to in previous seasons but never got around to it. We just use matte black Rustoleum for it. We also spray paint most of the base armor panels black to help the powder-coated parts pop. We try to minimize the amount of black that is visible on the outside of the robot. Spray paint is the one source of color we use that is fully repairable.
Appendix A - Aluminum Anodizing: A Story of 5 Buckets.

To anodize aluminum you’ll need the following:
- At least 5 large buckets with lids.
- Your parts must fit in the buckets with at least an inch of space between them and the bottom and sides, you also need to keep the part an inch below the surface of the liquid and you don’t want the buckets to overflow.
- We put 4.5 gallons of liquid into 5-gallon buckets. Plastic buckets from any hardware store will do just fine.
- You need a bucket for each of the 4 baths used in the process and a 5th bucket as the wash bucket.
- You’ll need an extra bucket for each additional color.
- I recommend having 2 wash buckets so one can be used as a cool-down bucket after the last step
- From Caswell, or another chemical supplier:
- Degreaser
- Sealant
- Anodizing Dye
- Fume suppressant
- Optional: desmut. More useful if your parts start dirty.
- 3x Immersion heaters with temperature control
- 3x thermometers (I like the kind with a sensor on a wire so the reading comes from the same depth as the part)
- DC Power supply. The power requirements are a little tricky to nail down, but we use a pair of 60V, 5A supplies in series. Larger parts will take more wattage.
- Alligator clips, big ones. Enough length to reach from your power supply to the top of the bucket with the power supply at least a foot away from the buckets.
- A timer (phone can work, but chemicals and gloves can make that annoying.)
- Get extra timers if you plan to do multiple parts in parallel
- Titanium wire or welding rod as a part hook. Thicker as your parts get larger. We use a ⅛“ welding rod for anything bigger than a deck of cards.
- Metal bars to suspend the hook in the fluid. Has to be long enough to bridge the bucket and strong enough to hold the part up.
- A fish tank aerator or other water agitation system. Needs to be chemical resistant. We use an external aerator with some flexible and PVC with holes drilled in it.
- Elbow-length, chemical resistant gloves
- Nitrile gloves
- Chemical resistant goggles
- Respirator and/or face protection
- Acetone
- 99% isopropyl alcohol
- Paper towels
- Tongs long enough to reach the bottom of a bucket and grabby enough to retrieve a dropped part
- Refillable spray bottle (for distilled water)
- Eyedropper (for fume suppressant)
- Gallons upon gallons of distilled water.
- With our setup, we need about 18 gallons to fill the buckets and we evaporate off about half a gallon of water per hour.
- Distilled water is available at most big grocery stores, it's under a dollar per gallon.
- Optional: sheets of heat-resistant foam to wrap the buckets in, this reduces how much active heating you need.
- Multiple 15+ amp wall outlet circuits. The heaters and power supplies will quickly overwhelm circuit breakers. Use surge protectors through the setup, since liquid and current can get dangerous. Try to avoid extension cords since they’re rarely rated for the kinds of power you’ll be using.
- Access to a slop sink, shower, or hose in case you need to flush an acid splash off your skin
- Access to an eyewash station (can be hooked up to a sink) or chemical eyewash solution.
- A well-ventilated area.
The process excluding set up. The bath setup is well detailed in the instructions that come with the chemical components.
- Clean a part with acetone
- Wear nitrile gloves for this step. Careful not to touch the part too much, attach it to a titanium hook, and suspend it at least an inch below the surface of the fluid. Put the part in a bucket with a degreasing agent dissolved in distilled water and keep it at nearly boiling for about 20 minutes.
- Take the part out and spray it with clean distilled water. Keep the part on the hook. When you spray the part, you want the water to flow off evenly, not bead up.
- If the water beads up, put it back in the degreaser bath for 10 minutes and check the temperature of the water. Depending on your heater, your bath may only be the right temperature for a few inches of depth. You need to circulate the water so it’s all roughly the same temperature. The whole process is fairly forgiving on bath temperatures.
- Move the hook and suspension bar to the anodizing bath. This bath needs to be mildly acidic, depending on the acid you use, different molarities are needed. We use battery acid (sulfuric). When you buy it as battery acid, it's already somewhat diluted.
- Most of the magic happens in this bath. Your part is hooked up to a power supply and has become the anode in your “battery in a bucket.” The fluid is also heated mildly to reduce activation energy. You’ll need a cathode with at least as much surface area as your part, and preferably much more. We use lead sheets. The water needs to be agitated to help keep bubbles from getting stuck and to help move the lost metal away from the part.
- The fumes from this bath are toxic and caustic. You can reduce the causticness with a fume suppressant chemical, but you still need to do this in a well-ventilated area.
- Wear large acid-resistant gloves, ideally up to your elbows. Be very careful to not splash any of the liquid onto your skin. Wear face and eye protection too. The acid is diluted enough that it won’t immediately cause a severe injury other than to your eyes, but you still need to flush any contacted area with clean water for half an hour. Read your warning labels and MSDS. Have the poison control phone number available just in case.
- The bubbles are a direct result of the oxide layer forming on the surface of the part. Anodizing creates a thin porous layer at the surface of the part, half above and half below. This layer in color anodizing is at most about 0.0005 inches thick, so your part is becoming as much as 0.00025 thicker. In robots, we don’t care about that kind of tolerance.
- As you increase the amperage, you decrease the amount of time your part needs to spend in this bath. The problem is if you use too much amperage, the part will start spalling and ruin the finish permanently. Too little and the part won’t saturate well and the color will come out with a gradient. We do most of the parts at 2 amps. The base math is roughly two hours for a square foot of surface area at one amp. More amps make it go faster, with the caveats I’ve mentioned.
- Reusing the same bath for too long is also a problem since the loose aluminum starts increasing the conductivity of the fluid and that will also decrease the surface finish quality.
- We reduce the anodizing bath time by about half to achieve more vibrant colors, essentially decreasing the depth of the oxide layer to retain as much of the intrinsic material brightness as possible. I almost ruined about half of the ESC heat sinks before we figured out all of the issues with getting the color right.
- Once the anodizing bath has run, wash the part with more distilled water. Don’t let the part spend too long outside of a bath. The oxide layer is delicate and can be affected by airborne contaminants.
- Put the part in the dye bath and carefully shake any bubbles loose. The dye bath is the only bath without any heat. In theory, you should be able to leave the part in the dye bath as long as you want, the dye is going to fill in all the porosity in the oxide layer. Where that doesn’t work is when you aren’t so sure of how thick that layer is and what the color will look like if the dye fully saturates the oxide layer. What I do instead is dip the part for about 20 seconds, then check it, then I check it every 10 seconds until I’ve got the color I want.
- For black dye or other dark/deep colors, it may take 5 or 15 minutes to fully saturate. Some dyes will take longer than others.
- Spray the part with distilled water to clean off the dye. Keep spraying it until the water dripping off the part is clear.
- Lower it into the nearly boiling sealant bath and leave it for 30 minutes. The sealant does two things:
- Keeps any exposed oxide layer from reacting to the air or skin oils
- Fills in any remaining surface porosity that isn’t filled with dye. This is why pulling it out of the dye bath early is fine.
- Once it’s done in the sealant bath, spray it with distilled water and then wipe it down with alcohol (not acetone) before setting it down. You may need to let the part cool down for a while, spray it with distilled water before leaving it alone, you don’t want the sealant to pool on any surfaces.
Appendix B -Titanium Anodizing: A Shorter Story Without Buckets
To Anodize Titanium you’ll need:
- Whink Rust Stain Remover (or hydrofluoric acid), enough volume to immerse your parts. - etchant
- 3 Polyethylene (PE) or polycarbonate (PC) containers. Not polypropylene (PP), it’ll melt and make a dangerous mess. Tempered glass is also an option.
- Battery acid or another strong acid (nitric or sulfuric) - catalyst
- Eye protection
- Face protection
- Respirator or fume hood
- Chemical resistant gloves
- 2 pairs of tongs (one for etchant, one for the anodize)
- Titanium wire
- 100V capable power supply
- Alligator clips
- At least a gallon of distilled water
- Sheet of titanium with more surface area than your largest part
- Refillable spray bottle
- Acetone
- Degreaser
- Heavy-duty paper towels or shop towels
- Timer
- Eyedropper
- A well-ventilated area
The process:
- Prepare a container with enough Whink rust stain remover to immerse the parts in. This is your etchant.
- Keep this in the fume hood or wear your respirator and eye protection.
- Prepare another container with distilled water and about 5% by volume battery acid. This is your anodizing bath.
- Do some testing and increase the acid content slowly until the results are quick and acceptable.
- This container will also need the sheet of titanium (only the submerged surface area counts, make sure there’s room for the parts without contacting this sheet or getting within about an inch).
- Fill the third container with just distilled water.
- Clean the part with a degreaser and then acetone.
- Use tongs to insert the part into the rust remover liquid.
- Leave the part in for 30-90 seconds. You’ll have to experiment with this. The part should have bubbles form all over the surface, so you may have to stir or roll it around in the liquid. The part should come out a slightly lighter color than it went in, if it comes out darker, it was in the solution too long. The surface finish should look like it was sanded.
- Only picking up the part with the tongs, put in a container full of distilled water to dilute the acid to effective neutrality.
- Clean the part with acetone, do not touch it with bare skin as it will absorb oil.
- Use the other pair of tongs to carefully lower the part into the anodizing bath.
- The titanium wire should be long enough to reach the part from well above the surface of the liquid. Bend a small hook into the end of the wire. Connect the other end of the wire to the alligator clip on the positive terminal.
- Insert the wire into the bath. Submerge it to the bottom without touching the part or cathode sheet.
- Turn on the power supply.
- Dial the power supply to a little lower than the voltage you want for the color you’ve selected.
- Touch the wire to the part and gently roll the part over once the color has reached the whole part. Make sure every surface has color, may need to touch the part in multiple places to get it fully even.
- Slowly increase the voltage until the color is what you want.
- Turn off the power supply.
- Remove the wire from the liquid.
- Use the tongs to remove the part from the liquid.
- Clean the part with distilled water from the spray bottle.
- Use acetone on a towel to clean the water off.
Note: If the color is too dark even after slowly adjusting the voltage, try reducing the time in the etchant. If it’s too light or inconsistent, slowly increase the time in the etchant and move the part around more.
Share:
Wheels | HyperTires: Foam Filled and Ready for Action
Finances | How to spend all your money, your friends' money, and still end up broke.